Imagine sinking your teeth into tender, succulent ribs that practically melt off the bone, bursting with rich, smoky-sweet flavor. What if we told you that achieving this BBQ nirvana doesn't require a smoker, a grill, or even perfect weather? The secret lies in your humble oven, and we're about to unlock its full potential with the ultimate baby back ribs recipe. Forget the fuss and the fear of dried-out meat; this guide reveals how to transform a simple rack of ribs into a culinary masterpiece with minimal effort and maximum reward.
Oven-baked ribs are a revelation for anyone seeking that "fall-off-the-bone" tenderness without constant monitoring. It's a surprisingly straightforward process that lets your oven do most of the heavy lifting. This comprehensive article will walk you through every step, from selecting the perfect rack to the crucial preparation steps, the magic of low-and-slow cooking, and the grand finale that delivers that irresistible, sticky, caramelized glaze. Get ready to impress your family and friends (and yourself!) with ribs so good, they'll think you spent all day slaving over them.
The Magic of Oven-Baked Ribs: Why Low and Slow Reigns Supreme
There's a common misconception that truly great ribs can only come from a grill or smoker. While those methods certainly have their charm, the oven offers a distinct advantage: unparalleled consistency and ease. When you cook ribs "low and slow" in the oven, you create a controlled, moist environment that is ideal for breaking down tough connective tissues.
- Consistent Temperature: Unlike a grill, an oven maintains a steady temperature, ensuring even cooking from start to finish. This consistency is key to achieving uniformly tender meat.
- Moisture Retention: Wrapping your ribs in foil during the initial baking phase traps steam, creating a self-braising effect. This moisture is crucial for tenderizing the meat and preventing it from drying out, leaving you with incredibly juicy results.
- Effortless Operation: Once your ribs are in the oven, your work is largely done. There's no need to constantly flip, monitor flare-ups, or worry about external elements like wind or rain. You can truly "set it and forget it" for hours.
- Flavor Infusion: The prolonged cooking time allows your chosen spice rub to deeply penetrate the meat, infusing every fiber with layers of delicious flavor.
This method not only simplifies the cooking process but consistently delivers ribs that are unbelievably tender, juicy, and packed with flavor – often rivalling or even surpassing those made outdoors.
Understanding Your Ribs: Baby Backs and Beyond
While this article focuses on a stellar baby back ribs recipe, it’s helpful to understand the different types of ribs available, as the oven method is versatile enough to work for most. Knowing your cuts helps you make an informed choice at the butcher.
- Baby Back Ribs: These are the star of our show. Taken from the loin area, near the backbone (hence "back ribs"), they are shorter and curvier than spare ribs. Baby back ribs boast a good amount of lean meat between and on top of the bones, making them exceptionally tender and a favorite for many. They are typically more expensive due to their desirable meat-to-bone ratio and tenderness.
- Spare Ribs: Hailing from the belly of the pig, spare ribs are larger and straighter than baby backs. They contain more meat between the bones and tend to have more fat, which renders beautifully during low-and-slow cooking, resulting in incredibly flavorful and moist ribs.
- St. Louis Style Ribs: These are essentially spare ribs that have been trimmed into a more uniform, rectangular shape by removing the sternum bone and cartilage. This makes them easier to handle and ensures more even cooking, without sacrificing the rich flavor profile of spare ribs.
Selecting the Best Rack: Pro Tips
When choosing your baby back ribs, look for racks with good meat coverage and minimal "shiners" (where the bone shows through). Aim for ribs that are plump and have a nice pink color. While some fat is good for flavor, excessive, thick layers of fat might indicate less meat. Don't be afraid to ask your butcher for a recommendation!
The Essential First Steps: Preparation for Perfection
Before your ribs even think about entering the oven, a couple of crucial preparation steps will lay the foundation for truly spectacular results. These steps are simple but make a world of difference.
The Crucial Membrane Removal
This might be the single most important step for achieving truly tender, melt-in-your-mouth ribs. On the bone side of the ribs, you'll find a thin, silvery membrane (also called the silver skin). If left on, this membrane becomes tough and chewy during cooking, preventing your seasonings from fully penetrating and making your ribs less enjoyable.
How to Remove the Membrane:
- Flip the Ribs: Place the rack bone-side up on a clean cutting board.
- Locate and Loosen: Look for a corner or edge of the membrane. Use a butter knife or the tip of a spoon to carefully slide under the membrane, separating it from the bone. Wiggle it gently until you can get a good grip.
- Grip and Pull: Once you've loosened a small section, grab the membrane firmly with a paper towel. The paper towel provides excellent grip, preventing your fingers from slipping.
- Peel Slowly: Slowly and steadily pull the membrane away from the ribs in one continuous motion. It might tear, but don't worry – simply re-grip any remaining pieces with your paper towel and continue pulling until it's completely removed.
Pro Tip: If the membrane is particularly stubborn, try starting from the middle of the rack rather than an end. Some ribs have a tougher attachment there. This step genuinely transforms the eating experience!
Crafting Your Flavor Foundation: The Dry Rub
A good dry rub is the backbone of any great rib recipe. It provides the initial layer of flavor that permeates the meat during the long cooking process. While store-bought rubs are convenient, crafting your own allows for customization and ensures fresh ingredients.
A Classic Dry Rub Base:
- 2 tablespoons smoked paprika (for color and depth)
- 1 tablespoon brown sugar (for sweetness and caramelization)
- 1 tablespoon garlic powder
- 1 tablespoon onion powder
- 1 tablespoon coarse salt (kosher or sea salt)
- 1 teaspoon black pepper
- ½ teaspoon cayenne pepper (optional, for a little kick)
Combine all ingredients thoroughly. Pat your ribs dry with paper towels (this helps the rub adhere better), then generously apply the rub to all sides of the ribs, massaging it into the meat. Don't be shy! For maximum flavor, you can rub the ribs several hours or even up to 24 hours in advance, then cover them tightly and refrigerate. This allows the spices to really meld with the meat.
Mastering the Oven: The Low & Slow Cooking Method
This is where the magic happens. The key to fall-off-the-bone ribs is patient, gentle cooking. Follow these steps for perfect results every time with your baby back ribs recipe.
- Preheat Your Oven: Set your oven to a consistent 275°F (135°C). This low temperature is crucial for tenderizing without drying out the meat.
- Prepare for Baking: Place the seasoned ribs on a large sheet of heavy-duty aluminum foil (or a double layer of regular foil). Ensure you have enough foil to completely enclose the rack. You can also place the ribs on a wire rack set inside a baking sheet to allow for better air circulation, though direct wrapping works excellently too.
- Wrap Tightly: Carefully wrap the ribs tightly in the foil, creating a sealed packet. Ensure there are no gaps for steam to escape. This creates that essential moist cooking environment.
- Bake, Baby, Bake: Place the foil-wrapped ribs directly on a baking sheet (to catch any potential drips) or on the wire rack in your preheated oven.
- For Baby Back Ribs: Bake for 2.5 to 3 hours.
- For Spare Ribs or St. Louis Style Ribs: Bake for 3 to 3.5 hours.
- Rest (Optional, but Recommended): Once baked, carefully remove the ribs from the oven. If you're not planning to broil them immediately, let them rest in their foil packet for 10-15 minutes. This allows the juices to redistribute, resulting in even more tender and flavorful meat.
For more detailed guidance on how to achieve that perfect "fall-off-the-bone" result every single time, you won't want to miss Master Easy Oven Baby Back Ribs: Fall-Off-The-Bone Every Time.
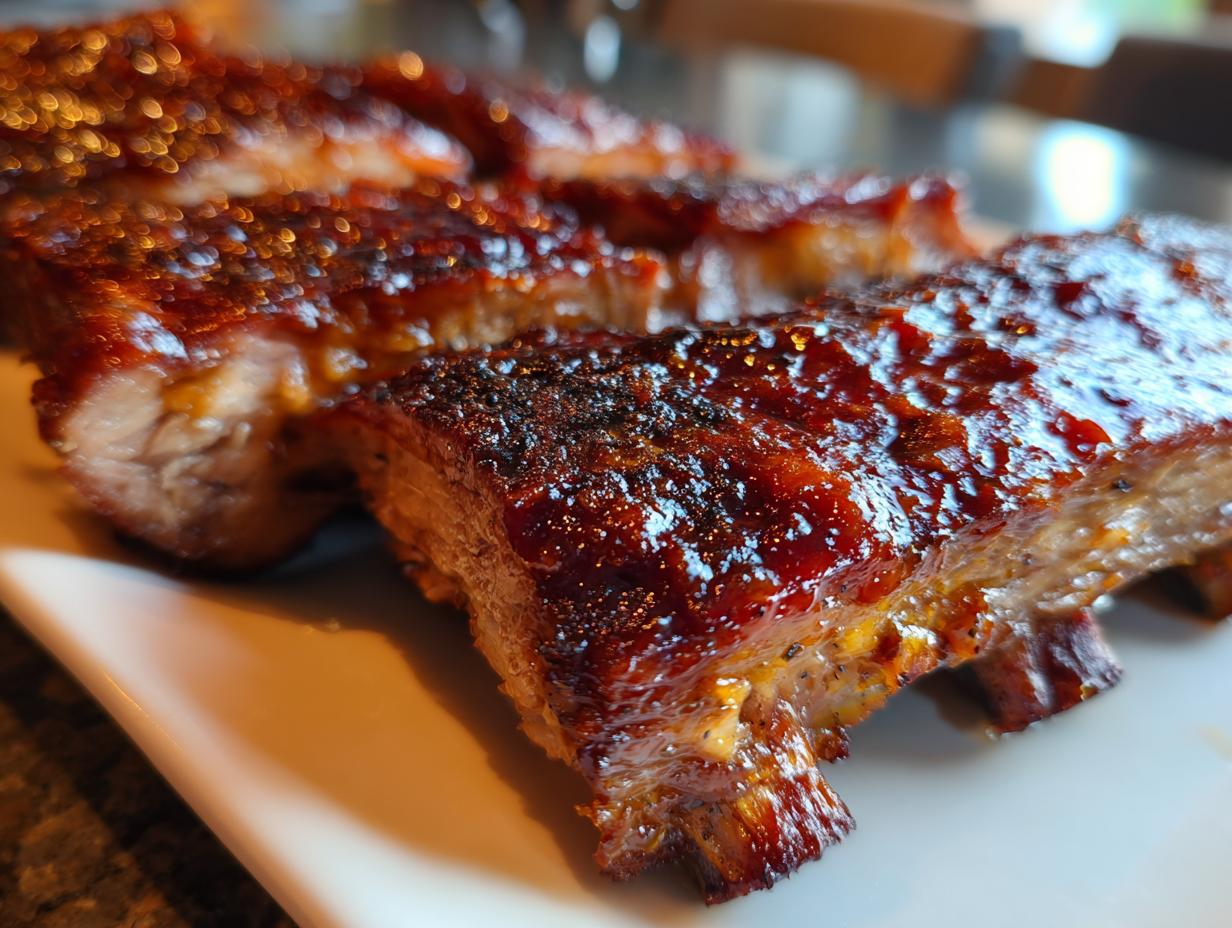
The Grand Finale: Achieving That Sticky, Caramelized Glaze
After the long, slow bake, your ribs are tender and flavorful. Now comes the exciting part: adding that irresistible, sticky, caramelized barbecue sauce finish. This step uses the broiler as your "upside-down grill."
- Preheat Broiler and Prep Ribs: Carefully unwrap the foil from the ribs, discarding any accumulated liquid. Transfer the ribs to a clean baking sheet, bone-side down. Position an oven rack about 6 inches below your broiler element.
- Apply the Sauce: Generously brush your favorite barbecue sauce over the top and sides of the ribs. Whether you prefer a tangy vinegar-based sauce, a sweet and smoky Kansas City style, or a spicy homemade concoction, now's the time to slather it on.
- Broil to Perfection: Place the sauced ribs under the preheated broiler. Broil for 5-10 minutes, keeping a very close eye on them. The sugars in the barbecue sauce can burn quickly. You're looking for the sauce to bubble, thicken, and develop a beautiful, slightly charred, caramelized glaze. This process intensifies the flavor and creates that desirable sticky texture.
- Flip and Repeat (Optional): For an all-around glaze, you can carefully flip the ribs, apply more sauce to the other side, and broil for another 3-5 minutes, again watching carefully.
Pro Tip: Consider warming your barbecue sauce slightly before applying it. This helps it spread more easily and adhere better to the ribs.
Troubleshooting & Pro Tips for Your Best Baby Back Ribs
Even seasoned home cooks encounter questions. Here are some common queries and advanced tips to ensure your baby back ribs recipe is always a triumph.
- "My ribs are dry!" This usually happens if they weren't wrapped tightly enough, allowing moisture to escape, or if they were cooked at too high a temperature. Ensure your foil is sealed well, and stick to the low-and-slow temperature.
- "My ribs aren't falling off the bone!" They likely need more time in the oven. Rib tenderness is a function of time and temperature. Don't rush the low-and-slow baking phase.
- Resting is Key: After broiling, let your ribs rest for 5-10 minutes before slicing. This allows the juices to redistribute, ensuring every bite is moist and flavorful.
- Slice Against the Grain: Once rested, carefully slice the ribs between the bones. A sharp knife will make this process much easier.
- Customizing Your Rub: Feel free to experiment with your dry rub! Add a touch of coffee grounds for a deeper, earthier flavor, or smoked chipotle powder for extra heat and smokiness.
- Homemade vs. Store-Bought Sauce: While a good quality store-bought BBQ sauce works wonders, don't shy away from making your own for an extra personal touch. Many recipes are surprisingly simple!
Remember, this cooking method is incredibly adaptable. For insights into how this technique can be applied to other cuts, delve into Effortless Oven Baked Ribs: Baby Back, Spare, & St. Louis-Style to expand your rib repertoire.
With this comprehensive guide, you now possess all the secrets to creating truly exceptional oven-baked baby back ribs. From the critical membrane removal to the transformative low-and-slow bake and the final glorious broil, each step contributes to a dish that is tender, juicy, and bursting with flavor. This baby back ribs recipe proves that you don't need fancy equipment or advanced grilling skills to achieve BBQ perfection. So, fire up your oven, gather your ingredients, and prepare to unlock a new level of culinary delight. Your journey to melt-in-your-mouth ribs starts now!
